" ". The Smiling Cat

Friday, March 21, 2014

Learning the Basics of Bargello-A Belated Valentine Table Runner

DSC00810 (2)
 
For quite a while I’ve been intrigued by the precision of Bargello quilt patterns.  They seem so complicated, I’ve been afraid to start one.  Last Christmas I bought my quilting buddy, Debbie, the book:  “Bargello Quilts” by Marge Edie.  I thought  it would fun to try to make one together.  Between the two of us, we should be able to figure it out.  If you are unfamiliar with Bargello:          
Bargello is a type of needlepoint embroidery consisting of upright flat stitches laid in a mathematical pattern to create curved  motifs. The name originates from a series of chairs found in the Bargello palace in Florence, which have a "flame stitch" pattern. Traditionally, Bargello was stitched in wool on canvas.  Traditional designs are very colorful, and use many hues of one color, which produces intricate shading effects. 
Here is an example of the “flame stitch”-
  Florentine (2)
In addition to Bargello embroidery, there are Bargello quilts in which these embroidery patterns are constructed with strips of fabric instead of wool.  In Bargello quilting, long strips of fabric are sewn together lengthwise, then the first and last strip are sewn together, forming a loop. The loop is laid flat on a cutting mat, and then cut vertically to make many narrow loops. The quilter then opens the loops by pulling out the stitching between two pieces of fabric, making a long, flat strip.  By opening the loops in between different pieces of fabric (for instance, between the first and second piece on one loop, then the second and third piece on the next loop), the quilter can make the colors of the quilt appear to curve. Slicing the loops very narrowly makes the curve appear sharp; cutting wide loops creates a more gentle movement in the quilt.  Bargello patterns are usually “quilt as you go” projects.  The individual strips are sewn on a base of backing and a flat cotton batting basted together. Working from the center toward the edges, using a sew and flip method to add each strip so the machine quilting shows only on the back side of the quilt. 
Okay-simple enough…..
 
I had some 1-1/2” red & white fabric strips left from a few Christmas projects, so I decided to make a very simple pattern for practice.  First, I randomly  sewed all the strips together lengthwise, using a 1/4” seam.  I didn’t want to deal with a complicated pattern, I just wanted to learn the technique.  When sewing the strips together, I started with a middle strip, and alternated sides when adding the other strips.  If you keep adding to the same side, it will curve in that direction.  I also used a smaller then usual stitch length to sew them together, so they wouldn’t pull apart later.
    
After pressing all the seams in the same direction, I sewed the first & last strips together lengthwise to make a sort of tube.
 
I then laid it flat on my cutting mat, lining-up all the lengthwise seams, and trimming the edge even.  Next, I began cutting 2-1/2” strips off the end of the tube, much like slicing bread. 
 
When all the strips were cut, I decided which rectangle would be the beginning rectangle , and removed the stitching in the seam between the beginning rectangle and what would be the ending rectangle.
  

I put this strip aside and picked another loop.  With this strip I moved over one rectangle to the left, and removed the stitching between the next two rectangles.  I continued strip by strip, each time moving over one rectangle to the left.  Creating a staggered pattern.  I handled them as carefully as possible, to avoid separating the wrong seams.
   
When all the strips were opened correctly, it was time to start sewing them together.  Starting with the first & second strips, taking my time and matching up the many intersections of the seams carefully.  Still using a 1/4” seam allowance.  I used many, many pins!  Also, when joining the first two strips, I  had to press the seams in the second row in the opposite direction of the first row.  Having the seams facing in opposite directions is always important, but in this case with so many small seams, it’s a must! 


I didn’t use the sew & flip method with this project, because I wasn’t using a pattern and I didn’t know how big it was going to be in the end.  I think it would help to keep the project stable.
   
I continued adding the rest of the strips, making sure the seams lined up.  Pressing after each row, and making sure the seams were facing in the opposite directions. 


I was happy with the way all the different fabrics came together!  I added a red border & a little white lace, and I had a small table runner.
 DSC00839 (1)
I added a layer of batting, lined it with plain white cotton backing & did a little quilting…….

DSC00835 (1)
And used small scaled red & white gingham for binding.

DSC00814 (1)

Even though I didn’t have it finished by Valentine’s Day, It is my valentine for this year.  This project came together much easier than I thought, and it has encouraged me to try a more complicated pattern in the future.
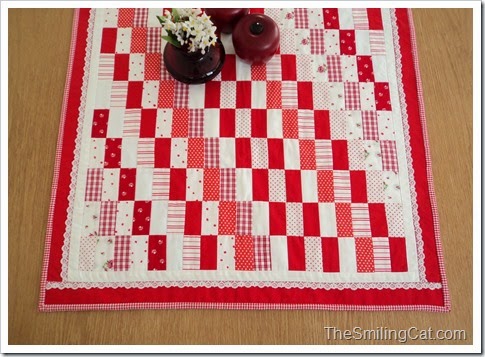
DSC00820 (1)
 DSC00826 (1)
Well, that’s all for now….Hope you’re having a great day! 
Please leave a comment if you have the time & let me know what you think.


Sunday, November 3, 2013

Beautiful Memory Quilt Up-cycled from a Wedding Dress

This is so beautiful-I had to share!

1383894_533617470056145_1530991959_n
Featured Member Quilts - 24 Blocks

This is the loveliest keepsake quilt I can imagine, it was featured on 24 Blocks FB page.  It was made by Lucy  Portsmouth for one of her customers from their wedding dress.

Lucy commented:  "I made this quilt from a wedding dress... the beading was lifted off the dress and re-attached to the quilt, and the whole thing is machine embroidered with a flowing leaf pattern.... the tulle ruffle around the edge was made from the dress petticoat."  The amount of handwork involved is clear in the photo and Lucy's hard work has resulted in a beautiful quilt.

I guess this kind of project has never occurred to me, because I've never had a big, formal wedding, and no expensive gown- but.....it makes so much sense!  A wedding dress is often the most special, if not the most expensive item in a woman's wardrobe.  Most women don't want to sell their wedding dress, but why just put it away for future use by a daughter or other relative?  It may be difficult to consider cutting up such a treasure, but why not use the material to create something elegant that can be used & enjoyed every day?!  Not just the fabric; add the lace and other special details like the buttons, beads & other trim. Maybe one of the bridesmaids would be willing to "contribute" her dress to the project, to add a bit of color and continue the wedding theme.  I imagine the tricky part of the construction, is reusing the delicate fabrics typically used for wedding dresses.  Foundation piecing might be a good technique to use. 

What an amazing gift for a sister or friend who can’t sew! 

Inspired by this, I explored online a bit to see what info I could find.  Unfortunately, I mostly found ads by those who want to create, then sell you a memory quilt.  After digging around, I did find these tutorials....

This first one is from www.Netplaces.com:


"Quilt A Memory" by Terrry L. Rye & Jacquelynne Johnson

Quilt A Memory Pattern~

This quilt isn't made from a wedding dress, but I love the look.  Their free pattern is clear & detailed, although a bit dated!  It would be easy to use this pattern as a guide to take your own direction.  This is a signature quilt made from white cotton squares signed by guests at the wedding reception.

Also a good idea from www.WeddingBee.com.....

Memory Quilt :  wedding palm springs Quilt2

How To Make a Memory Quilt~

This is also a signature quilt with a nice tutorial about stamping the signatures permanently with ink.  This one also suggests collecting the signatures at the bridal shower rather than the wedding reception...interesting?

I suppose any traditional block can be used, or simple crazy quilting:


(via:  Pinterest)
 
Or more ornate:


(via: kittyandmedesigns.blogspot.com)
 
I have to show these, just because these are so pretty:


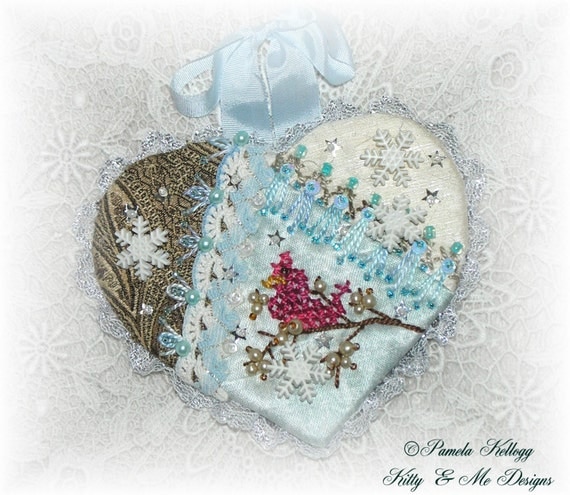
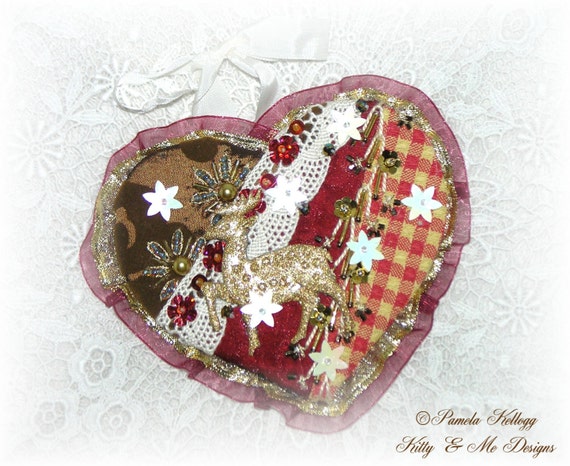
Crazy quilted Christmas ornaments, also designed by Pamela Kellogg of  Kitty and Me Designs.

Interested in Crazy Quilting?:

History of Crazy Quilts~

Wedding dresses aren't of much use sitting away in a closet just wasting space.  Think about repurposing them into something useful & full of beautiful memories!  Also, there are many lovely wedding dresses that have been donated to thrift shops or are for sale in consignment shops.  Not all will get a second life in a wedding and the fabric they contain might a special, new keepsake.

Saturday, September 7, 2013

Thrifty Blue Pinstripe Pinwheels Made from Men’s Shirting


I love men’s cotton shirting fabric, and (don’t laugh) I always look through the men’s shirt section when thrifty shopping.  I find quite a few good quality, cotton dress shirts that don’t show much, if any wear, and only cost around $5.00.  The colors may be muted, but come in delightful large & thin stripes, paisleys, and other fun prints.  Each long sleeve shirt can be cut into five good-sized pieces:  two front pieces, two sleeves and the back.  You end up with at least a yard of good quality, usable fabric, and get several nice-sized buttons as well.

I found this pretty, medium blue with a narrow orange pinstripe cotton.  Great colors & I love the woven texture!  I paired it with a dark yellow cotton linen, left-overs from a past project, that I’d already cut into 5” squares.  Pinstripes….led to pinwheel squares. 
To make 64 (3-1/2”) pinwheels, I used: 
  •   32-5” squares of pinstripe men’s shirting- One large Men’s long-sleeve dress shirt should be plenty.
  •   32-5” squares( 5/8 to one yard) of bright yellow cotton linen
You could use this pattern to make pinwheels using pre-cut 5” Charm Squares.  You would be able to make two pinwheel squares from each 5” charm square paired with yellow, white or another neutral color.
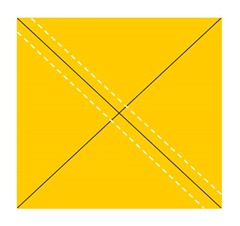
In order to make the pinwheels, I needed to make 1/2 square triangles.  The yellow linen was already cut into 5” squares, so I cut a few 5” squares of the striped fabric to experiment with some ideas.  I settled on making four 1/2 square triangle units from each 5” square pair of fabrics, using the ‘X marks the spot system’.  I began by marking a pencil line on each diagonal.
Presentation1a
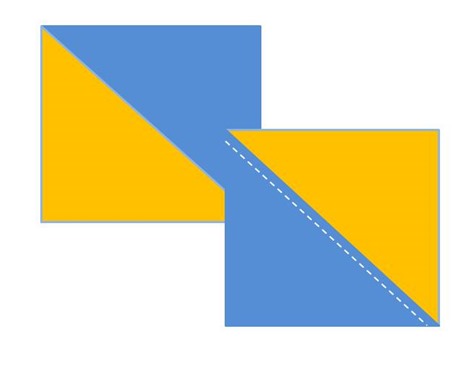
After marking the X-I fed them one by one through my machine, corner to corner, chain sewing a 1/4” seam on both sides of each drawn line. Because I was cutting so many units from each square, and so much handling can pull out stitches, I did a quick backstitch at the beginning and end of each square.
Presentation1b
Quick tip:  When reaching the end of first chain, DON’T cut them apart yet!  With needle still down in last stitch, raise presser foot, turn around and then sew down the other side of the line, while they’re still attached.

 
Just pull them along, twisting and turning them right side up.  This saves time and thread!  Now cut to separate, clipping both threads at once.
After cutting them apart, I pressed them, being careful not to pull and distort the fabric.  I repeated these steps on the other diagonal:
Presentation1c
  I pressed again, using spray starch, and then cut the squares in half lengthwise……


…………………………………………………………………………………and cross-wise.
Presentation1d
Lastly, I cut the resulting squares in half by cutting on the pencil line.
Presentation1e
After cutting them apart, I carefully pressed the units open, pressing toward the blue cotton.  I noticed that even though this is a simple, even stripe-I got four distinctly different 1/2 square triangles, which were approximately 2” square.   So, I sorted them into four stacks, and arranged these stacks in the correct placement of the pinwheel, keeping the stripes going the same direction.
  
I finished one block as a “master” and kept it to compare each new block to as I continued.  I started with the top row of units, flipping the right unit over the left unit, right sides together, lining up the diagonal seams.  I stacked the pairs, keeping the side to be sewn to the rightPresentation1fI chained stitched the units together, using a 1/4” seam, then pressed open.  Because the yellow linen is thicker, I pressed toward the blue stripe fabric, and trimmed off the little triangle ‘dog ears’.  I did the same with the bottom row.  Then, I matched the center seams and sewed the top row to the bottom row.  This time I pressed the seams open.


I trimmed the pinwheels to 3-1/2” square.  Pretty-  huh?!


To connect the pinwheels.  I cut 1” strips of an orange cotton as sashing.  I divided the pinwheels into two piles, and started by sewing a sashing strip to the bottom of the first pile. I pressed toward the sashing, then added the second pinwheel to the opposite side of the orange sashing.
 
Again, I divided the units into two piles, and connected these units with another strip of orange sashing.  These completed blocks were 7” square.  Then, I cut 1-1/2” sashing strips of a solid blue cotton.  I repeated the same steps as with the orange sashing to join the pinwheel blocks together, to form 4-pinwheel blocks.  These measured 14-1/2” square.


I ended up with four of the 4-pinwheel blocks, and connected them with more of the blue sashing.  I used the blue sashing as the first border.  Then added a 1/2” yellow border, and a 1-1/2” border of a pale blue cotton that I decided to use as the backing.  Another border of the remains of the 1/2” orange sashing, and then the last of the 1-1/2” medium blue sashing.  This project sure made a dent in my scrap stash, and I love the bright colors!


Here it is layered, pinned and ready for quilting.  I haven’t quite decided how to finish this project.  But, I’ve just been using up some of my ‘left-over’ fabrics, so why not experiment a bit?   
That’s all for now-Carole

Monday, May 13, 2013

Daisy-An Appliqué Cat-Fusible Web Appliqué

My sister, Lyn is a successful novelist.  She helped pioneered the ‘Inspirational Romance’ genre.  Recently, she asked me to be a guest at her blog-Books by Lyn Cote.  Her stories have a strong, Christian message, and are historically accurate.  The following is the project I shared with her.  I don’t know if it’s what she expected, but I hope she likes it!
I only get to see my big sis, Lyn, once a year, usually in the summer, at her lovely home in upper WI.  Last summer we spent an afternoon at a quilt show in nearby Eagle River.  Trees for Tomorrow Park provided the perfect setting for the Cranberry Country Quilt Guild’s ‘Walk in the Woods’ Quilt Show. Beautiful quilts displayed informally outside on clotheslines between the trees. 
 IMG_4459
Along with the quilts were lots of vendors, such as Laura Krasinski, who was representing Bigfork Bay Cotton Co.  She was also selling her first original pattern, Daisy, a raw-edge, appliqué cat pattern.  My sister bought the pattern and I promised to make it for her.  She wanted to have something made by me to hang in her office, she’s such a sweetie.  When she asked me to be a guest on her blog, I thought it would be the perfect project to share.

DDDDDAISY_thumb2
The ‘Daisy’ Pattern can be found at Craftsy.
 

The pattern includes a layout guide and three sheets of fusible web with the pattern pieces already printed on them.  This is not a pattern for beginners, at least intermediate appliqué skills are needed.  The instructions are very general, leaving most decisions up to the quilter, and its designed to use up small scraps of favorite fabrics.  The original Daisy pattern was fused, raw-edge appliquéd and then simply quilted.  I decided to loosen up and see where the pattern would lead me.


First, I got out my rayon machine embroidery thread, and started matching fabrics with the threads.  I tried to choose a nice variety of colors, and since the pattern pieces where small, I stuck to mostly solid fabrics. 

  
First, I picked a light blue cotton for the background, sprayed it heavily with the spray starch and pressed it.  The pattern told me to start with the grass, so I ironed the grass pattern piece to the wrong side of the green grass fabric.  Then, I cut it out and fused it to the bottom of the blue background. 

 
Next, I started working on the cat.  I decided on a black & white cat, to match my kitty-‘Miss Cookie’.


I fused the cat pattern to the black cotton I’d picked out. Fusible web has a paper side & a sticky side. The pattern piece is traced on the paper side then the sticky side is pressed to the back of the fabric. The pattern piece is cut out; the paper is pulled off, leaving a sticky film on the back of the piece. I fused the sticky back to the blue background as shown on the guide.


I set-up my sewing machine with my black rayon thread, and used a tight zig-zag stitch to sew the cat’s body to the background.  Again, I positioned it as shown on the guide.  Now, the pattern directed me to draw on the cat’s face with a fine sharpie, but I decided to hand embroider the face. 


I traced the face on plain, white cotton.  Also, I decided to include the cat’s ears on the head rather than separately.


When I was happy with the face, I fused the web to the back, right over the stitching.  I cut it out and positioned the head as shown on the guide, and pressed it to  the background.  Then, I pinned a small piece of fabric stabilizer to the back of the background, to prevent puckering, as the piece was a bit small. 

 
I switched my machine to white thread, and again used a tight zig-zag stitch to sew it to the background.  I also added a small piece of black fabric to the  top of the head.

While I had the white thread in, I decided to put a heart-shaped patch on the body. Then, I started adding a few white flower shapes. Still zig-zagging, I added two flowers, then trimmed around the stabilizer.


Time to stop & see how things were shaping up.
 
 
Yikes! So boring. I needed to put a bit more thought into this. I showed it to my friend, Debbie, and she started pulling different fabrics from her stash. When she pulled out the ‘Day Glow Daisy’ fabric, I knew we were on to something.


I got out my super sharp appliqué scissors, and cut the cat figure away from the blue background-careful not to cut into the outline stitching. Then, I stitched the kitty to the new background, added a few flowers & leaves.

Next, another friend, Diana, helped me do some simple, free motion quilting. Lastly, I finished it with the original light-blue fabric as binding.


So, do you think my sister, Lyn, will like it?

IMG_1036

Laura Krasinski has designed a companion pattern- a dog-Dexter!  It can be found at Laura's wesite Laura Krasinski.com.

Well, that’s all for now, Carole

Blogger Labels: Daisy,Appliqué,Fusible web,novelist,Lyn Cote,quilt show,Eagle River,Trees for Tomorrow,quilt,Cranberry Counrty Guild,beautiful fabric,Applique pattern,Laura Krasinski,Cottage style,cat pattern,Pattern,Craftsy,fabric scraps,machine applique,embroidery,threads,floral background,sewing,pieces,fabric,hand-dye fabrics,Miss Cookie,fusible web paper,heart,patch,flowers,scissors,Dexter pattern,fusible web sheets,pieces,skills,fabrics,summer,quilts,rayon,black