
My sister, Lyn is a successful novelist. She helped pioneered the ‘Inspirational Romance’ genre. Recently, she asked me to be a guest at her blog-Books by Lyn Cote. Her stories have a strong, Christian message, and are historically accurate. The following is the project I shared with her. I don’t know if it’s what she expected, but I hope she likes it!
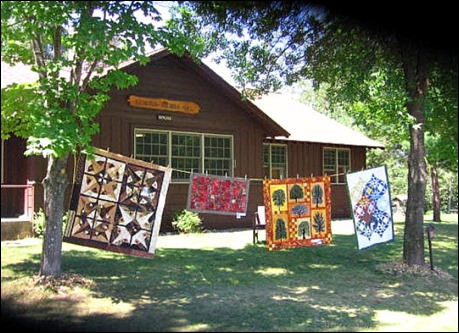
I only get to see my big sis, Lyn, once a year, usually in the summer, at her lovely home in upper WI. Last summer we spent an afternoon at a quilt show in nearby Eagle River. Trees for Tomorrow Park provided the perfect setting for the Cranberry Country Quilt Guild’s ‘Walk in the Woods’ Quilt Show. Beautiful quilts displayed informally outside on clotheslines between the trees.
Along with the quilts were lots of vendors, such as Laura Krasinski, who was representing Bigfork Bay Cotton Co. She was also selling her first original pattern, Daisy, a raw-edge, appliqué cat pattern. My sister bought the pattern and I promised to make it for her. She wanted to have something made by me to hang in her office, she’s such a sweetie. When she asked me to be a guest on her blog, I thought it would be the perfect project to share.
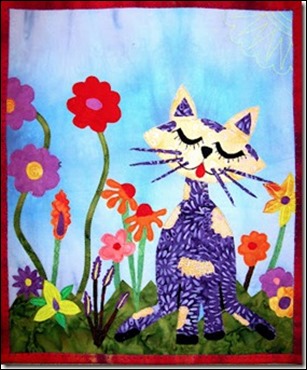
The ‘Daisy’ Pattern can be found at Craftsy.

The pattern includes a layout guide and three sheets of fusible web with the pattern pieces already printed on them. This is not a pattern for beginners, at least intermediate appliqué skills are needed. The instructions are very general, leaving most decisions up to the quilter, and its designed to use up small scraps of favorite fabrics. The original Daisy pattern was fused, raw-edge appliquéd and then simply quilted. I decided to loosen up and see where the pattern would lead me.

First, I got out my rayon machine embroidery thread, and started matching fabrics with the threads. I tried to choose a nice variety of colors, and since the pattern pieces where small, I stuck to mostly solid fabrics.
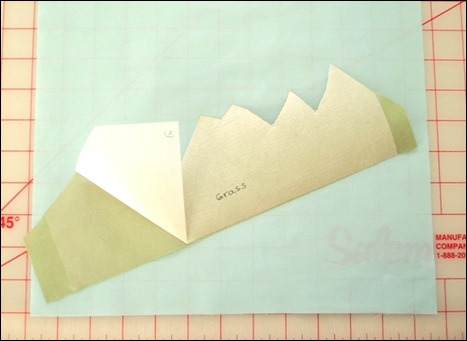
First, I picked a light blue cotton for the background, sprayed it heavily with the spray starch and pressed it. The pattern told me to start with the grass, so I ironed the grass pattern piece to the wrong side of the green grass fabric. Then, I cut it out and fused it to the bottom of the blue background.
Next, I started working on the cat. I decided on a black & white cat, to match my kitty-‘Miss Cookie’.

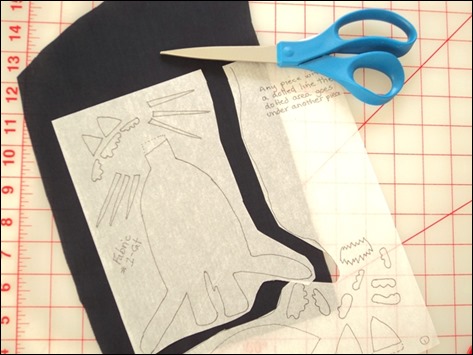
I fused the cat pattern to the black cotton I’d picked out. Fusible web has a paper side & a sticky side. The pattern piece is traced on the paper side then the sticky side is pressed to the back of the fabric. The pattern piece is cut out; the paper is pulled off, leaving a sticky film on the back of the piece. I fused the sticky back to the blue background as shown on the guide.
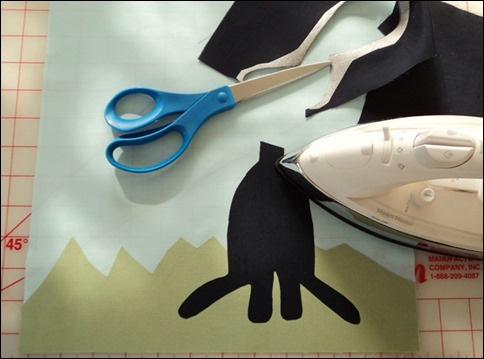
I set-up my sewing machine with my black rayon thread, and used a tight zig-zag stitch to sew the cat’s body to the background. Again, I positioned it as shown on the guide. Now, the pattern directed me to draw on the cat’s face with a fine sharpie, but I decided to hand embroider the face.

I traced the face on plain, white cotton. Also, I decided to include the cat’s ears on the head rather than separately.

When I was happy with the face, I fused the web to the back, right over the stitching. I cut it out and positioned the head as shown on the guide, and pressed it to the background. Then, I pinned a small piece of fabric stabilizer to the back of the background, to prevent puckering, as the piece was a bit small.

I switched my machine to white thread, and again used a tight zig-zag stitch to sew it to the background. I also added a small piece of black fabric to the top of the head.

While I had the white thread in, I decided to put a heart-shaped patch on the body. Then, I started adding a few white flower shapes. Still zig-zagging, I added two flowers, then trimmed around the stabilizer.

Time to stop & see how things were shaping up.

Yikes! So boring. I needed to put a bit more thought into this. I showed it to my friend, Debbie, and she started pulling different fabrics from her stash. When she pulled out the ‘Day Glow Daisy’ fabric, I knew we were on to something.

I got out my super sharp appliqué scissors, and cut the cat figure away from the blue background-careful not to cut into the outline stitching. Then, I stitched the kitty to the new background, added a few flowers & leaves.
Next, another friend, Diana, helped me do some simple, free motion quilting. Lastly, I finished it with the original light-blue fabric as binding.
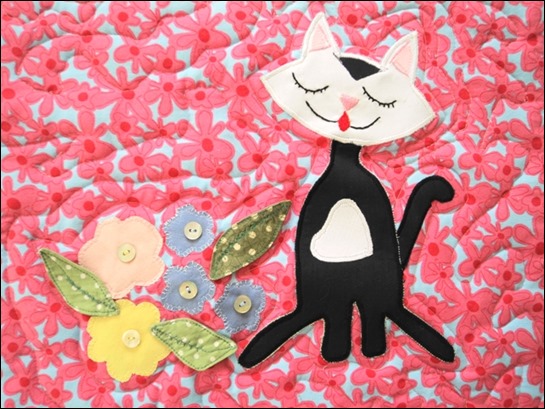

So, do you think my sister, Lyn, will like it?
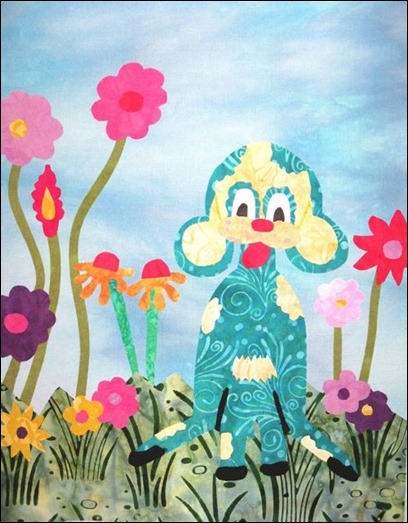
Laura Krasinski has designed a companion pattern- a dog-Dexter! It can be found at Laura's wesite Laura Krasinski.com.
Well, that’s all for now, Carole
Blogger Labels: Daisy,Appliqué,Fusible web,novelist,Lyn Cote,quilt show,Eagle River,Trees for Tomorrow,quilt,Cranberry Counrty Guild,beautiful fabric,Applique pattern,Laura Krasinski,Cottage style,cat pattern,Pattern,Craftsy,fabric scraps,machine applique,embroidery,threads,floral background,sewing,pieces,fabric,hand-dye fabrics,Miss Cookie,fusible web paper,heart,patch,flowers,scissors,Dexter pattern,fusible web sheets,pieces,skills,fabrics,summer,quilts,rayon,black
I only get to see my big sis, Lyn, once a year, usually in the summer, at her lovely home in upper WI. Last summer we spent an afternoon at a quilt show in nearby Eagle River. Trees for Tomorrow Park provided the perfect setting for the Cranberry Country Quilt Guild’s ‘Walk in the Woods’ Quilt Show. Beautiful quilts displayed informally outside on clotheslines between the trees.

Along with the quilts were lots of vendors, such as Laura Krasinski, who was representing Bigfork Bay Cotton Co. She was also selling her first original pattern, Daisy, a raw-edge, appliqué cat pattern. My sister bought the pattern and I promised to make it for her. She wanted to have something made by me to hang in her office, she’s such a sweetie. When she asked me to be a guest on her blog, I thought it would be the perfect project to share.

The ‘Daisy’ Pattern can be found at Craftsy.

The pattern includes a layout guide and three sheets of fusible web with the pattern pieces already printed on them. This is not a pattern for beginners, at least intermediate appliqué skills are needed. The instructions are very general, leaving most decisions up to the quilter, and its designed to use up small scraps of favorite fabrics. The original Daisy pattern was fused, raw-edge appliquéd and then simply quilted. I decided to loosen up and see where the pattern would lead me.

First, I got out my rayon machine embroidery thread, and started matching fabrics with the threads. I tried to choose a nice variety of colors, and since the pattern pieces where small, I stuck to mostly solid fabrics.

First, I picked a light blue cotton for the background, sprayed it heavily with the spray starch and pressed it. The pattern told me to start with the grass, so I ironed the grass pattern piece to the wrong side of the green grass fabric. Then, I cut it out and fused it to the bottom of the blue background.

Next, I started working on the cat. I decided on a black & white cat, to match my kitty-‘Miss Cookie’.

I fused the cat pattern to the black cotton I’d picked out. Fusible web has a paper side & a sticky side. The pattern piece is traced on the paper side then the sticky side is pressed to the back of the fabric. The pattern piece is cut out; the paper is pulled off, leaving a sticky film on the back of the piece. I fused the sticky back to the blue background as shown on the guide.

I set-up my sewing machine with my black rayon thread, and used a tight zig-zag stitch to sew the cat’s body to the background. Again, I positioned it as shown on the guide. Now, the pattern directed me to draw on the cat’s face with a fine sharpie, but I decided to hand embroider the face.

I traced the face on plain, white cotton. Also, I decided to include the cat’s ears on the head rather than separately.

When I was happy with the face, I fused the web to the back, right over the stitching. I cut it out and positioned the head as shown on the guide, and pressed it to the background. Then, I pinned a small piece of fabric stabilizer to the back of the background, to prevent puckering, as the piece was a bit small.

I switched my machine to white thread, and again used a tight zig-zag stitch to sew it to the background. I also added a small piece of black fabric to the top of the head.

While I had the white thread in, I decided to put a heart-shaped patch on the body. Then, I started adding a few white flower shapes. Still zig-zagging, I added two flowers, then trimmed around the stabilizer.

Time to stop & see how things were shaping up.

Yikes! So boring. I needed to put a bit more thought into this. I showed it to my friend, Debbie, and she started pulling different fabrics from her stash. When she pulled out the ‘Day Glow Daisy’ fabric, I knew we were on to something.

I got out my super sharp appliqué scissors, and cut the cat figure away from the blue background-careful not to cut into the outline stitching. Then, I stitched the kitty to the new background, added a few flowers & leaves.
Next, another friend, Diana, helped me do some simple, free motion quilting. Lastly, I finished it with the original light-blue fabric as binding.


So, do you think my sister, Lyn, will like it?

Laura Krasinski has designed a companion pattern- a dog-Dexter! It can be found at Laura's wesite Laura Krasinski.com.
Well, that’s all for now, Carole


